
Chicken Parmesan Recipe
When it comes to comfort food that delivers both satisfaction and elegance, few dishes can compete with a perfectly executed Chicken Parmesan. This beloved Italian-American classic transforms simple chicken breasts into a golden, crispy masterpiece topped with rich marinara sauce and melted mozzarella cheese. Whether you’re cooking for a family dinner or impressing guests at a dinner party, this Chicken Parmesan recipe delivers restaurant-quality results right in your own kitchen.
Unlike many complicated recipes, this approach to Chicken Parmesan is surprisingly accessible for home cooks of all skill levels. You’ll discover how proper preparation techniques, from pounding the chicken to the optimal thickness to achieving the perfect golden-brown crust, can elevate your cooking game significantly. The combination of panko breadcrumbs and freshly grated Parmesan cheese creates a coating that stays crispy even under the blanket of melted mozzarella and tangy marinara sauce.
Ingredients
Chicken:
2 large boneless, skinless chicken breasts
Salt and pepper, to taste
¼ cup vegetable oil (or as needed)
Flour Mixture:
½ cup all-purpose flour
1½ teaspoons seasoned salt
¼ teaspoon black pepper
Eggs:
2 eggs, beaten until frothy
½ teaspoon garlic powder
Breading:
1½ cups panko breadcrumbs
⅓ cup freshly grated Parmesan cheese
1 teaspoon dried parsley
1 teaspoon dried oregano
Cheese & Topping:
1 cup marinara sauce
1½ cups shredded mozzarella cheese
Fresh parsley, chopped (for garnish)
Instructions
Step 1: Prepare for Baking
Preheat your oven to 425°F (218°C). This high temperature is crucial for achieving the perfect balance between melted cheese and maintaining the crispy coating on your chicken cutlets.
Set up three shallow pans or bowls for the breading process:
- First station: Combine flour, seasoned salt, and black pepper
- Second station: Beat the eggs until very frothy and mix in garlic powder
- Third station: Combine panko breadcrumbs, grated Parmesan cheese, dried parsley, and dried oregano
This organized breading station is essential for creating an efficient workflow and ensuring each piece of chicken receives consistent coating.
Step 2: Prepare the Chicken
Slice each chicken breast in half lengthwise to create 2-3 thinner pieces. This technique is crucial for even cooking and prevents the exterior from burning while the interior remains undercooked.
Place the chicken between plastic wrap and pound with the flat side of a meat mallet until about ½ inch thick. This pounding technique not only ensures uniform thickness but also tenderizes the meat fibers, resulting in more succulent chicken parmigiana.
Pat the chicken completely dry with paper towels and season both sides lightly with salt and pepper. Removing excess moisture is critical for proper breading adhesion.
Step 3: Bread the Chicken
Dredge each piece of chicken in the flour mixture, ensuring complete coverage. The flour creates a foundation that helps the egg wash adhere properly. Shake off any excess flour to prevent clumping.
Dip the floured chicken into the egg mixture, allowing excess egg to drip off. The frothy eggs create a sticky base for the breadcrumb coating.
Coat the chicken generously in the breading mixture, pressing gently to ensure the panko breadcrumbs and Parmesan cheese adhere firmly to the surface.
Step 4: Fry the Chicken
Heat vegetable oil in a large skillet over medium-high heat until it shimmers. The oil temperature should be around 350°F for optimal frying results.
Fry the breaded chicken in batches, avoiding overcrowding which can lower oil temperature and result in soggy coating. Cook for 3-4 minutes per side until golden brown and crispy.
Monitor the heat carefully, adjusting as necessary to prevent burning while ensuring thorough cooking. Transfer the fried chicken to a wire cooling rack to drain excess oil.
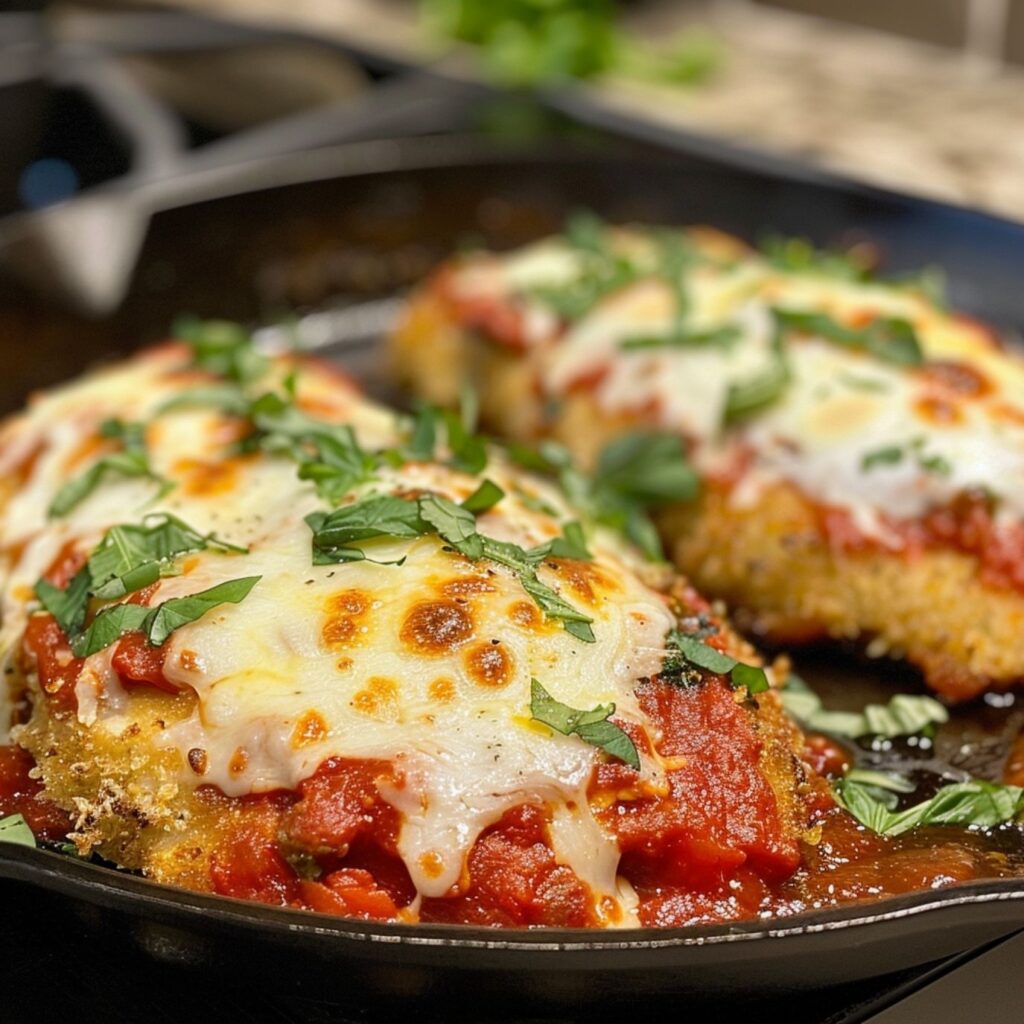
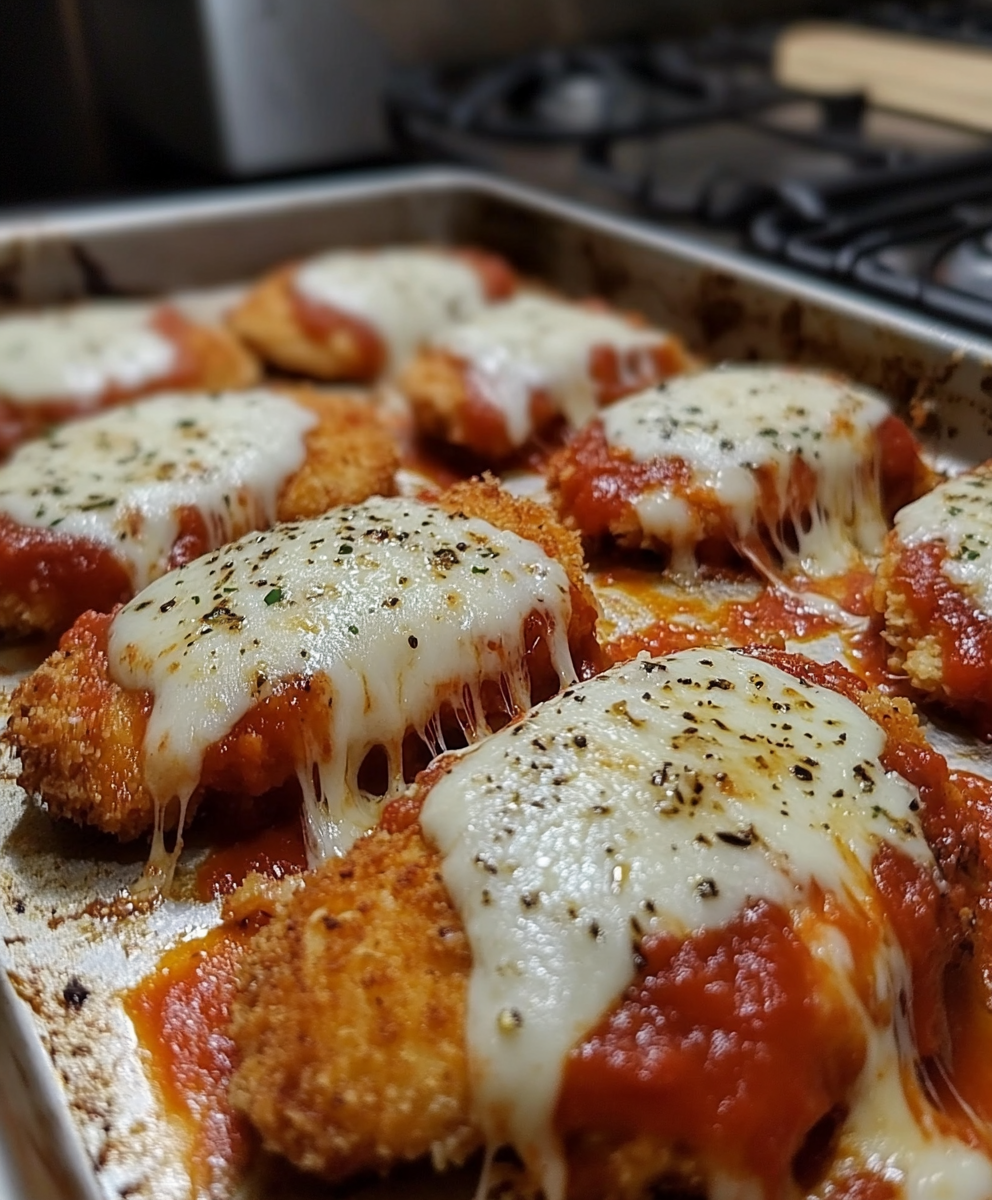
Step 5: Bake with Marinara and Cheese
Place the pan-fried chicken on a large, light-colored baking sheet. Dark baking sheets can cause over-browning due to increased heat absorption.
Top each piece with marinara sauce and shredded mozzarella cheese, distributing evenly for consistent melting and flavor in every bite.
Bake in the preheated oven for 12 minutes. For extra browning, broil at 425°F for 1-2 minutes at the end, watching closely to prevent burning.
Step 6: Serve
Garnish with freshly chopped parsley for a pop of color and fresh flavor that complements the rich, cheesy coating.
Serve immediately with spaghetti and garlic bread for the complete Italian dining experience. Always ensure the internal temperature of the chicken reaches 165°F (74°C) before serving for food safety.
Recipe Summary
This Chicken Parmesan recipe combines pan-frying and baking techniques to create perfectly crispy, cheesy chicken cutlets. The three-stage breading process with seasoned flour, frothy eggs, and panko-Parmesan coating ensures restaurant-quality results. Proper chicken preparation and temperature control guarantee juicy interior with golden exterior every time.
Ready to create this delicious Chicken Parmesan? Try this recipe tonight and share your results in our review section below! Don’t forget to leave a comment about your cooking experience, and subscribe to our blog for more mouth-watering Italian recipes and cooking tips delivered straight to your inbox.
FAQs
Q: Can I use chicken thighs instead of chicken breasts for this Chicken Parmesan recipe? A: Absolutely! Chicken thighs work wonderfully and often provide more flavor and juiciness. Bone-in, skin-on thighs will require longer cooking time (about 35-40 minutes total), while boneless thighs can follow the same timing as breasts. The dark meat’s higher fat content makes it more forgiving if slightly overcooked.
Q: How can I make this Chicken Parmesan recipe gluten-free? A: Replace the all-purpose flour with a gluten-free flour blend and substitute regular panko breadcrumbs with gluten-free panko or finely ground gluten-free crackers. Ensure your marinara sauce and seasonings are certified gluten-free, as some brands may contain wheat-based thickeners.
Q: Can I prepare Chicken Parmesan ahead of time? A: Yes! You can bread the chicken up to 4 hours in advance and refrigerate on a wire rack. For make-ahead meals, complete the recipe through the frying stage, then refrigerate for up to 2 days. When ready to serve, add sauce and cheese, then bake at 375°F for 15-20 minutes until heated through.
Q: What’s the best way to reheat leftover Chicken Parmesan? A: To maintain the crispy coating, reheat in a 350°F oven for 10-15 minutes rather than using the microwave. Place on a wire rack over a baking sheet to allow air circulation underneath, which prevents the bottom from becoming soggy.
Q: Why is my breading falling off during cooking? A: This usually happens when the chicken is too wet or the breading isn’t pressed firmly enough. Always pat chicken completely dry, let breaded pieces rest for 10-15 minutes before frying, and gently press the breadcrumb coating to ensure adhesion. Also, avoid moving the chicken too early during frying.
Q: Can I bake the entire Chicken Parmesan instead of frying first? A: While frying creates the best texture, you can bake the breaded chicken at 425°F for 20-25 minutes, then add sauce and cheese for the final 10 minutes. Spray the breaded chicken lightly with cooking oil before baking to help achieve golden browning.
Q: What sides pair best with Chicken Parmesan? A: Classic pairings include spaghetti with marinara sauce, garlic bread, Caesar salad, or roasted vegetables like zucchini and bell peppers. For lighter options, try it over mixed greens or with a simple arugula salad dressed with lemon vinaigrette.
Q: How do I know when the oil is the right temperature for frying? A: The oil should shimmer and reach about 350°F. If you don’t have a thermometer, test by dropping a small piece of breadcrumb into the oil – it should sizzle immediately and turn golden within 30 seconds. Oil that’s too hot will burn the coating before cooking the chicken through.
Chicken Parmesan Recipe
Ingredients
- Chicken:
- 2 large boneless skinless chicken breasts
- Salt and pepper to taste
- ¼ cup vegetable oil or as needed
- Flour Mixture:
- ½ cup all-purpose flour
- 1½ teaspoons seasoned salt
- ¼ teaspoon black pepper
- Eggs:
- 2 eggs beaten until frothy
- ½ teaspoon garlic powder
- Breading:
- 1½ cups panko breadcrumbs
- ⅓ cup freshly grated Parmesan cheese
- 1 teaspoon dried parsley
- 1 teaspoon dried oregano
- Cheese & Topping:
- 1 cup marinara sauce
- 1½ cups shredded mozzarella cheese
- Fresh parsley chopped (for garnish)
Instructions
- Step 1: Prepare for Baking
- Preheat your oven to 425°F (218°C). This high temperature is crucial for achieving the perfect balance between melted cheese and maintaining the crispy coating on your chicken cutlets.
- Set up three shallow pans or bowls for the breading process:
- First station: Combine flour, seasoned salt, and black pepper
- Second station: Beat the eggs until very frothy and mix in garlic powder
- Third station: Combine panko breadcrumbs, grated Parmesan cheese, dried parsley, and dried oregano
- This organized breading station is essential for creating an efficient workflow and ensuring each piece of chicken receives consistent coating.
- Step 2: Prepare the Chicken
- Slice each chicken breast in half lengthwise to create 2-3 thinner pieces. This technique is crucial for even cooking and prevents the exterior from burning while the interior remains undercooked.
- Place the chicken between plastic wrap and pound with the flat side of a meat mallet until about ½ inch thick. This pounding technique not only ensures uniform thickness but also tenderizes the meat fibers, resulting in more succulent chicken parmigiana.
- Pat the chicken completely dry with paper towels and season both sides lightly with salt and pepper. Removing excess moisture is critical for proper breading adhesion.
- Step 3: Bread the Chicken
- Dredge each piece of chicken in the flour mixture, ensuring complete coverage. The flour creates a foundation that helps the egg wash adhere properly. Shake off any excess flour to prevent clumping.
- Dip the floured chicken into the egg mixture, allowing excess egg to drip off. The frothy eggs create a sticky base for the breadcrumb coating.
- Coat the chicken generously in the breading mixture, pressing gently to ensure the panko breadcrumbs and Parmesan cheese adhere firmly to the surface.
- Step 4: Fry the Chicken
- Heat vegetable oil in a large skillet over medium-high heat until it shimmers. The oil temperature should be around 350°F for optimal frying results.
- Fry the breaded chicken in batches, avoiding overcrowding which can lower oil temperature and result in soggy coating. Cook for 3-4 minutes per side until golden brown and crispy.
- Monitor the heat carefully, adjusting as necessary to prevent burning while ensuring thorough cooking. Transfer the fried chicken to a wire cooling rack to drain excess oil.
- Step 5: Bake with Marinara and Cheese
- Place the pan-fried chicken on a large, light-colored baking sheet. Dark baking sheets can cause over-browning due to increased heat absorption.
- Top each piece with marinara sauce and shredded mozzarella cheese, distributing evenly for consistent melting and flavor in every bite.
- Bake in the preheated oven for 12 minutes. For extra browning, broil at 425°F for 1-2 minutes at the end, watching closely to prevent burning.
- Step 6: Serve
- Garnish with freshly chopped parsley for a pop of color and fresh flavor that complements the rich, cheesy coating.
- Serve immediately with spaghetti and garlic bread for the complete Italian dining experience. Always ensure the internal temperature of the chicken reaches 165°F (74°C) before serving for food safety.