
Bakery-Style Chocolate Chip Cookies
the average bakery-style chocolate chip cookie contains 23% more butter than homemade versions, which is precisely why they achieve that coveted thick, chewy texture that crumbles perfectly with every bite? This isn’t just a coincidence – it’s the result of carefully calibrated ratios that most home bakers overlook. Today’s chocolate chip cookies recipe will transform your kitchen into a professional bakery, delivering those impossibly soft centers and golden edges that make store-bought cookies so irresistible.
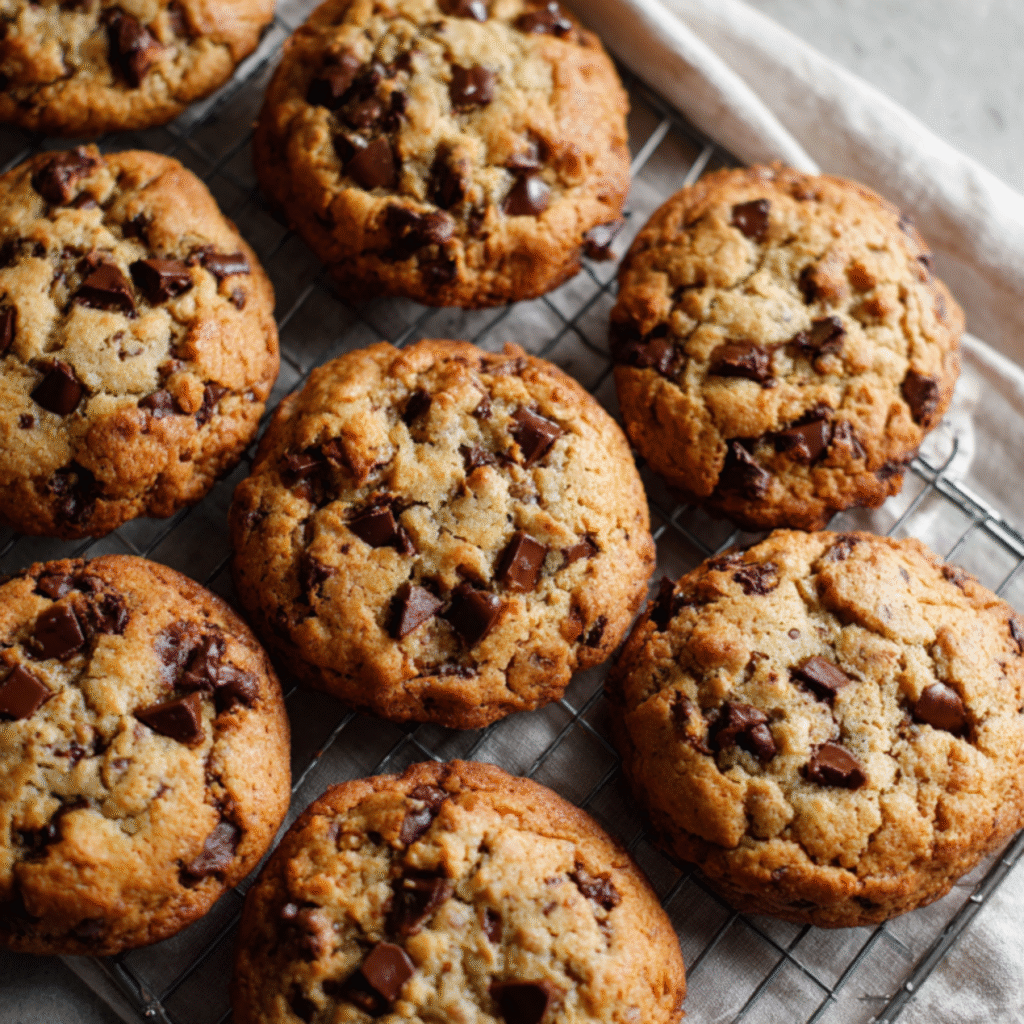
The secret lies not just in the ingredients, but in understanding the science behind what makes chocolate chip cookies truly exceptional. From the precise temperature that activates gluten development to the exact moment when sugar crystals create that perfect chewy texture, every element of this recipe has been designed to deliver bakery-quality results in your own home.
Ingredients List
Transform your kitchen into a chocolate chip cookie paradise with these carefully selected ingredients that work in perfect harmony:
Dry Foundation:
- 3 cups all-purpose flour (the protein content creates structure while maintaining tenderness)
- 1 tsp baking soda (creates the perfect lift and spread)
- ½ tsp salt (enhances chocolate flavors and balances sweetness)
Rich, Creamy Base:
- 1 cup butter, at room temperature (the key to that bakery-style richness)
- 1¼ cups packed brown sugar (adds moisture and deep caramel notes)
- ¼ cup granulated sugar (creates crispy edges and helps with spreading)
- 2 tsp vanilla extract (pure vanilla elevates every flavor note)
- 2 large eggs (binds ingredients while adding richness)
The Star Ingredient:
- 12 oz semi-sweet chocolate chips (generous chunks that create melty pockets of chocolate bliss)
Each ingredient serves a specific purpose in creating the perfect texture and flavor profile that rivals your favorite bakery’s signature cookies.
Step-by-Step Instructions
Prepare Dry Ingredients
Start by creating your flour foundation in a large mixing bowl. Whisk together the all-purpose flour, baking soda, and salt until completely uniform. This seemingly simple step ensures even distribution of leavening agents, preventing any bitter or salty spots in your finished cookies. Set this mixture aside – it’s the backbone of your cookie structure.
Cream Butter and Sugars
In your largest mixing bowl, combine room-temperature butter with both brown and granulated sugars. Beat this mixture for 3-4 minutes until it becomes noticeably light, fluffy, and pale in color. This creaming process incorporates air into the mixture, creating the tender texture that separates bakery-style cookies from dense homemade versions. The mixture should nearly double in volume and feel significantly lighter.
Add Vanilla and Eggs
Pour in the vanilla extract first, allowing its aromatic compounds to blend seamlessly with the creamed mixture. Add eggs one at a time, beating thoroughly after each addition until completely incorporated. This gradual process prevents the mixture from breaking and ensures a smooth, cohesive batter that will hold together beautifully during baking.
Combine Dry and Wet Ingredients
Gradually fold the flour mixture into your wet ingredients using the lowest speed on your mixer. Mix only until you can no longer see streaks of flour – overmixing at this stage develops too much gluten, resulting in tough cookies instead of the tender texture we’re after. The dough should look slightly rough and just barely combined.
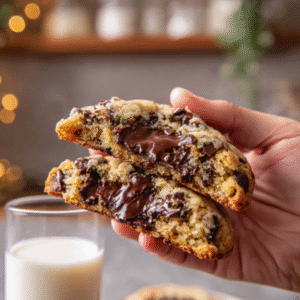
Fold in Chocolate Chips
Gently fold in those generous 12 ounces of chocolate chips using a wooden spoon or rubber spatula. Distribute them evenly throughout the dough, ensuring every bite will contain multiple chocolate encounters. The dough will be thick and substantial – this is exactly what creates that bakery-style heft.
Shape the Cookies

Using a large cookie scoop or measuring spoon, portion out approximately 2 tablespoons of dough per cookie onto parchment-lined baking sheets. Leave at least 2 inches between each portion – these cookies will spread as they bake. For extra bakery appeal, gently press a few additional chocolate chips onto the tops of each dough ball.
Bake
Preheat your oven to 325°F – this lower temperature allows the cookies to bake evenly without burning the edges before the centers are set. Bake for 12-13 minutes, watching for edges that are just beginning to turn golden while centers still appear soft and slightly underbaked. Remove from oven and let cookies rest on the baking sheet for 5 minutes before transferring to a cooling rack.
Nutritional Information
Understanding the nutritional profile helps you enjoy these treats mindfully:
Per Cookie (makes approximately 24 cookies):
- Calories: 245
- Total Fat: 11g (17% DV)
- Saturated Fat: 7g (35% DV)
- Cholesterol: 35mg (12% DV)
- Sodium: 180mg (8% DV)
- Total Carbohydrates: 36g (13% DV)
- Dietary Fiber: 2g (7% DV)
- Sugars: 22g
- Protein: 4g (8% DV)
Key Nutrients:
- Iron: 8% DV (from enriched flour)
- Calcium: 4% DV (from dairy ingredients)
- Vitamin A: 6% DV (from butter)
These cookies provide sustained energy from complex carbohydrates and healthy fats, making them a satisfying treat when enjoyed in moderation.
Healthier Alternatives for the Recipe
Create lighter versions without sacrificing that signature bakery taste:
Flour Modifications: Replace up to 1 cup of all-purpose flour with whole wheat pastry flour for added fiber and nutrients. This substitution maintains tenderness while boosting the nutritional profile significantly.
Sugar Reductions: Reduce total sugar by ¼ cup and add 2 tablespoons of unsweetened applesauce for moisture. You can also substitute half the brown sugar with coconut sugar for a lower glycemic index.
Healthy Fat Swaps: Replace half the butter with mashed ripe banana or Greek yogurt for reduced saturated fat and added protein. This creates slightly more cake-like cookies that are still incredibly satisfying.
Chocolate Upgrades: Choose dark chocolate chips (70% cacao or higher) for antioxidants and reduced sugar content. Mix in chopped nuts like walnuts or almonds for healthy omega-3 fatty acids and protein.
Gluten-Free Option: Substitute the all-purpose flour with a 1:1 gluten-free baking flour blend, adding an extra ¼ teaspoon of xanthan gum if not included in your blend.
Serving Suggestions
Elevate your chocolate chip cookies beyond the ordinary:
Temperature Variations: Serve warm with a glass of cold milk for the classic experience, or try them at room temperature with hot coffee for adult sophistication. For special occasions, warm cookies slightly and serve with vanilla ice cream for an instant cookie sandwich.
Flavor Pairings: Crumble over vanilla yogurt with fresh berries for breakfast, or chop and fold into homemade ice cream. These cookies also complement cheese plates surprisingly well – try pairing with mild cheddar or cream cheese.
Presentation Ideas: Package in clear cellophane bags tied with ribbons for gift-giving, or arrange on tiered stands for parties. For casual entertaining, serve directly from a rustic wooden board with various milk options.
Seasonal Adaptations: During holidays, drizzle with melted white chocolate and sprinkle with crushed candy canes, or dip half of each cookie in dark chocolate for elegant entertaining.
Common Mistakes to Avoid
Learn from the most frequent baking pitfalls to ensure success:
Temperature Troubles: Using cold butter creates dense cookies, while overly warm butter leads to flat, greasy results. Room temperature butter should give slightly when pressed but maintain its shape.
Measurement Mishaps: Packing flour into measuring cups can add up to 25% more flour than needed, creating dry cookies. Spoon flour lightly into cups and level with a knife for accuracy.
Timing Errors: Overbaking is the number one mistake – cookies continue cooking on hot pans after removal from the oven. Remove when centers look slightly underdone for perfect texture.
Mixing Mistakes: Overmixing after adding flour develops gluten excessively, creating tough cookies. Mix just until ingredients are barely combined for tender results.
Size Inconsistencies: Varying cookie sizes lead to uneven baking – some burnt while others remain raw. Use a cookie scoop for uniform portions and consistent baking times.
Storing Tips for the Recipe
Maximize freshness and maintain that perfect texture:
Short-Term Storage: Store cooled cookies in airtight containers at room temperature for up to one week. Place parchment paper between layers to prevent sticking and maintain shape.
Long-Term Preservation: Freeze baked cookies in freezer-safe containers for up to three months. Thaw at room temperature for 20 minutes before serving – they’ll taste freshly baked.
Dough Storage: Portion raw dough onto baking sheets and freeze until solid, then transfer to freezer bags. Bake directly from frozen, adding 1-2 extra minutes to baking time.
Freshness Maintenance: Add a slice of bread to your storage container – it releases moisture that keeps cookies soft. Replace the bread slice every few days to prevent mold.
Travel Tips: For transporting, pack cookies in rigid containers with crumpled parchment paper to prevent movement and breaking during transport.
Conclusion
This bakery-style chocolate chip cookies recipe delivers the perfect combination of crispy edges, chewy centers, and generous chocolate distribution that rivals professional bakeries. The secret lies in proper ingredient ratios, careful mixing techniques, and understanding how temperature affects texture development throughout the baking process.
Try this recipe today and discover why proper technique transforms simple ingredients into extraordinary treats. Share your results in our comments section, subscribe for weekly baking tips, and let us know how these cookies compared to your favorite bakery’s version!
FAQs
Q: Why are my cookies spreading too much during baking?
A: Excessive spreading typically occurs when butter is too warm, dough is too warm when placed in the oven, or baking temperature is too low. Chill shaped dough for 15 minutes before baking and ensure your oven has fully preheated to 325°F.
Q: Can I make these cookies smaller for portion control?
A: Absolutely! Use 1 tablespoon portions instead of 2, and reduce baking time to 9-11 minutes. Smaller cookies bake faster and create more servings per batch, perfect for portion management.
Q: What’s the best way to achieve perfectly round cookies?
A: Use a cookie scoop for uniform portions, then gently roll each portion between your palms before placing on baking sheets. Avoid flattening – let the oven heat create the perfect shape naturally.
Q: Why do my cookies turn out cake-like instead of chewy?
A: Cake-like texture usually results from too much flour, too much leavening, or overmixing. Measure flour accurately by spooning and leveling, and mix just until ingredients are barely combined after adding flour.
Q: How can I tell when my cookies are perfectly done?
A: Look for edges that are just beginning to turn golden brown while centers still appear soft and slightly underbaked. The cookies will continue cooking on the hot pan after removal from the oven, finishing the baking process perfectly.
Bakery-Style Chocolate Chip Cookies
Ingredients
- Ingredients List
- Transform your kitchen into a chocolate chip cookie paradise with these carefully selected ingredients that work in perfect harmony:
- Dry Foundation:
- 3 cups all-purpose flour the protein content creates structure while maintaining tenderness
- 1 tsp baking soda creates the perfect lift and spread
- ½ tsp salt enhances chocolate flavors and balances sweetness
- Rich Creamy Base:
- 1 cup butter at room temperature (the key to that bakery-style richness)
- 1¼ cups packed brown sugar adds moisture and deep caramel notes
- ¼ cup granulated sugar creates crispy edges and helps with spreading
- 2 tsp vanilla extract pure vanilla elevates every flavor note
- 2 large eggs binds ingredients while adding richness
- The Star Ingredient:
- 12 oz semi-sweet chocolate chips generous chunks that create melty pockets of chocolate bliss
- Each ingredient serves a specific purpose in creating the perfect texture and flavor profile that rivals your favorite bakery’s signature cookies.
Instructions
- Prepare Dry Ingredients
- Start by creating your flour foundation in a large mixing bowl. Whisk together the all-purpose flour, baking soda, and salt until completely uniform. This seemingly simple step ensures even distribution of leavening agents, preventing any bitter or salty spots in your finished cookies. Set this mixture aside – it’s the backbone of your cookie structure.
- Cream Butter and Sugars
- In your largest mixing bowl, combine room-temperature butter with both brown and granulated sugars. Beat this mixture for 3-4 minutes until it becomes noticeably light, fluffy, and pale in color. This creaming process incorporates air into the mixture, creating the tender texture that separates bakery-style cookies from dense homemade versions. The mixture should nearly double in volume and feel significantly lighter.
- Add Vanilla and Eggs
- Pour in the vanilla extract first, allowing its aromatic compounds to blend seamlessly with the creamed mixture. Add eggs one at a time, beating thoroughly after each addition until completely incorporated. This gradual process prevents the mixture from breaking and ensures a smooth, cohesive batter that will hold together beautifully during baking.
- Combine Dry and Wet Ingredients
- Gradually fold the flour mixture into your wet ingredients using the lowest speed on your mixer. Mix only until you can no longer see streaks of flour – overmixing at this stage develops too much gluten, resulting in tough cookies instead of the tender texture we’re after. The dough should look slightly rough and just barely combined.
- Fold in Chocolate Chips
- Gently fold in those generous 12 ounces of chocolate chips using a wooden spoon or rubber spatula. Distribute them evenly throughout the dough, ensuring every bite will contain multiple chocolate encounters. The dough will be thick and substantial – this is exactly what creates that bakery-style heft.
- Shape the Cookies
- Using a large cookie scoop or measuring spoon, portion out approximately 2 tablespoons of dough per cookie onto parchment-lined baking sheets. Leave at least 2 inches between each portion – these cookies will spread as they bake. For extra bakery appeal, gently press a few additional chocolate chips onto the tops of each dough ball.
- Bake
- Preheat your oven to 325°F – this lower temperature allows the cookies to bake evenly without burning the edges before the centers are set. Bake for 12-13 minutes, watching for edges that are just beginning to turn golden while centers still appear soft and slightly underbaked. Remove from oven and let cookies rest on the baking sheet for 5 minutes before transferring to a cooling rack.